A free website for beginners to learn the new technologies like Appian, .NET, Java, Low-Code Development etc. Detailed solutions to your bugs and errors in the Applications.
Hi, Appian Developers!
I hope you all are doing well and safe. Today we are going to learn to insert
multiple records for customer in a database table named tbl_customer using
an editable grid in Appian. I would clear in the starting, you must be
certified with Appian Associate Developer, so it will be easy for you all. First
I will tell you the whole requirements and what we are going to implement here.
Requirement:
Let’s consider, that we
have a tbl_customer in the Appian cloud database. And this table has the following
fields as
You can see the below
screenshot for how does your table looks like.
Now, we want to
insert multiple customer details in one go instead of adding them one by one.
It means we will add the multiple customer data from an interface using an
editable grid in Appian.
e.g., Customer1,
Customer2, Customer3, and Customer4 will have their own CustomerID,
CustomerName, emailID, and so on. By implementing this, we are not required to
add the n number of customer details one by one. So, without wasting our time,
let’s switch to Appian Designer Console. As I am using the free community edition
of Appian, I have my own Appian Designer console. You can also request your
instance by clicking on this link https://community.appian.com/
I am creating a new
application named “Practice for Appian” as below screenshot.
As I have checked the
box in yellow highlighted in the above screenshot.
It will create some
default folders and groups for me. This feature is available in only Appian
version 21.4 release or later. Now click on the save button and you will see your application is created with default objects with folders and groups as below.
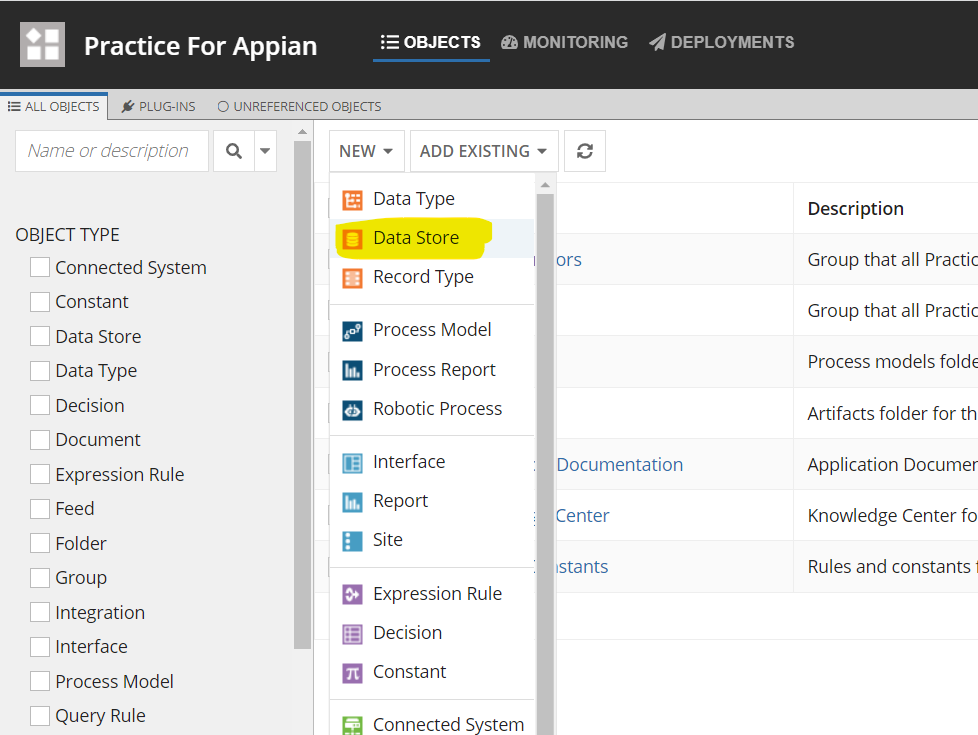
First, we
will create our Data Store for our application which helps to establish a
connection between our database and application. To create the Data Store, please click on the new button and select Data Store as below screenshot.
You must enter your datastore name and description as below.
Now click on Create button and choose your security for datastore object and click on the Save button as below.
Note:Once your CDT is created, do not forget to verify and publish your Data Store.
As we have already
created our database table, so now we will create our CDT. To create a CDT, please click on the New button and select Data Type as below screenshot.
We will create our CDT using "Create from a database table or view" and select your Data Source name and table as below.
Now you must enter your CDT name and select your Data Store which we have created as above. Please see the below screenshot for your reference.
Once your CDT is created, now we will create a Constant for our entity as below.
Both Datastore and CDT have been created, now we will create our interface using an editable grid. To create an Interface, please click on the New button and select Interface as below.
Please enter your Interface name below.
Now click on Create button, and you will see the below window.
Now switch to expression mode and paste the below code into your Interface.
Once you pasted the above code, you will see what your interface looks like as below screenshot.
Wow, Congratulations!!! Our interface is ready to insert the multiple customer data into our database table tbl_Customer.
Let's add a few customer details to the form and click on Submit button as below.
Congratulation...!!! 💓💓💓
Successfully, we have inserted our 5 customer details into the database table. As you can see from the below screenshot for our table record.
Note:
I have created two constants, one is to save the customer profile picture, the constant type is a folder, and the second is for CDT, the constant type is the Data Store Entity. And Please add one rule input as items to your interface.
I have used a!writeToDataStoreEntity function on Submit button in the interface to save the customer data into the database table.
Please see my below objects for the application.
I hope, this blog will help you to understand the use of an editable grid within the interface.
Thank you so much for your time.
Please comment if you have any issues regarding the same.
In this tutorial, we will learn a clean and simple way to implement Razor Page CRUD in Asp.Net Core with jQuery Ajax and Bootstrap Modal. This is the Entity Management Set of CRUD operations which doesn't reload the Pages, we can call it Single Page Application.
Table of Contents:
Scope
The Architecture
Getting Started with Razor Page CRUD in ASP.NET Core
Setting up the Project
Setting up the Core Layer
Setting up the Infrastructure Layer
Setting up the Asp.Net Core Project
Rendering Razor Partial View to String
Scope
There are the things we will be implementing in our CRUD Application. This will be an Employee Management System.
Data Annotations for Validations
jQuery Validations and Unobstructive Validations - Client Side Validations
Bootstrap Modal
Dyanamic Loading of Partial Views via Ajax Calls
Repository Pattern with Unit of. Work
Onion Architecture Solutions
jQuery Datatables
The Architecture
To keep things simple and clean we will be using onion architecture with inverted dependencies.
We will create three layers in this project repectively Web, Core and Infrastructure.
Getting Started with Razor Page CRUD in Asp.Net Core 3.1
Let's create the required projects, here I am creating the Web project first using Visual Studio 2019
for Mac.
Setting up the Projects
Setting up the Core Layer
Let's add a new project withing the same solution and name it Core. This will be created as .Net Core Library 3.1
Let's add two folders Entities and Interfaces in the Core Project. And under the Entities folder, create a new class and name it Employee
To follow the Repository pattern, we will add a new interface and name it IGenericRepositoryAsync under the Interfaces folder in Core Proejct Layer.
So we have a generic repository. now to use this generic interface for a specific entity like an employee along with extra methods, we will add a new interface and name it IEmployeeRepositoryAsync
Let's add the unit of work
We have completed everything for the Core Project Layer, now let's move to create Infrastructure Project Layer as we did for the Core Project layer.
Setting up the Infrastructure Project Layer
Let's install the below-required packages for Infrastructure Layer
Now that you have Entity Framework Core installed at the Infrastructure Layer, let’s add the ApplicationDbContext in-order to access the database. (We will be setting the connection string to the database later in this article at the Web Layer.)
Create a new Folder in the Infrastructure Layer and name it Data. Here add a new Class and name it ApplicationDbContext.cs
Add a new folder in the Infrastructure layer and name it Repositories. Here add a new class, GenericRepositoryAsync.cs
As you can see from the above, almost all the CRUD operations ever needed for any entity is covered. T could be any class and you already have an entire class that could Perform Create, Read, Update and Delete Operations on the T Entity. But also see that we are not saving anything directly to the database via the Repository Implementation. Rather we will have a separate class that is responsible for Committing changes to the database. You should have heard about Unit Of Work, yeah?
Create another new class and name it UnitOfWork.cs in the Infrastructure layer.
Let's add the last implementation which is responsible for performing the CRUD operations specific to Employee Entity.
Setting up the Asp.Net Core Project
Let's install the below-required packages for the Web project layer.
With that done, open up the Startup.cs. Here we will have to add the services/dependencies to our ASP.NET Core Container. Navigate to the ConfigureServices method and add the following. Note that you would have to fix the reference warnings that may occur.
We should add the connectionString in our appsettings.json file... So let's move to add ConnectionStrings
Let's install the jQuery Datatables into our Web project and add the reference for DataTables in _Layout.cshtml file as below.
Since we are already here, let’s also add the skeleton of the Bootstrap Modal that we are going to use further in the article. Above the footer tag, add the HTML for the Modal. Note that the Modal Body is empty. This is because we will be filling it dynamically via jQuery AJAX with Razor Partial Views.
There is already a site.js file under the wwwroot/js folder. So let's add the below code.
Here we'll add the 3 functions which will be required for CRUD operations and it's the important part of our project which allows us not to reload the pages.
GetAll() - Loads all the Employees from the database to the jQuery DataTables.
CreateOrEdit() - This functions do the Create or Edit an employee.
Delete() - It deletes an employee from the database.
Now the missing pieces to the puzzle are as follows:
1. Razor Partial View to Hold the jQuery Datatable.
2. Razor Partial View to Add / Edit Customer.
3. A way to convert Razor Views to String, so that jQuery AJAX can fetch this string and simply overwrite the existing div / DOM object on the HTML. (This was particularly tough to figure out.)
4. And finally, our C# Handler methods that will return the partial views as requested by the AJAX calls.
Let’s start with the _ViewAll.cshtml. This will hold the HTML table definition and also the script needed to activate jQuery Datatable. Under the Pages folder in the Web Project, Create a new Razor View (Empty) and name it _ViewAll.cshtml.
Next, Let’s create the Form, CreateOEdit that will have all the fields we require. This is again a straight forward piece of code snippet. Create a new Razor Page View (Empty) and name it _CreateOrEdit.cshtml and add in the following.
Now we required the partial views, so let's add the following code in our existing Index.cshtml file
Rendering Razor Partial View to String
Now, the question is, We have Razor Partial Views and AJAX, how do you convert Razor Partial Views to Strings / HTML. The answer is to create a service that can do so. In the Web Project add a new Folder and name it Services. And in it, create a new class and name it RazorRenderService.cs
Let's add the below services into the Startup.cs as in ConfigureServices method.
This is the final part of the puzzle. The actual Index.cs. Open it up and add the following.
Now you can build your all projects and run the application... :)